1) INK JET PRINTING, store bought sheets
Many photo-transfer cloth sheets designed for ink jet printers are available at craft stores and online. They’re a little pricey but super convenient.
Different weights of cotton are available, as well as silk and organza. For patchwork, regular cotton is best. To print something for framing, canvas offers stability and a nice finish, while for collages, the sheer organza allows for interesting layering possibilities.
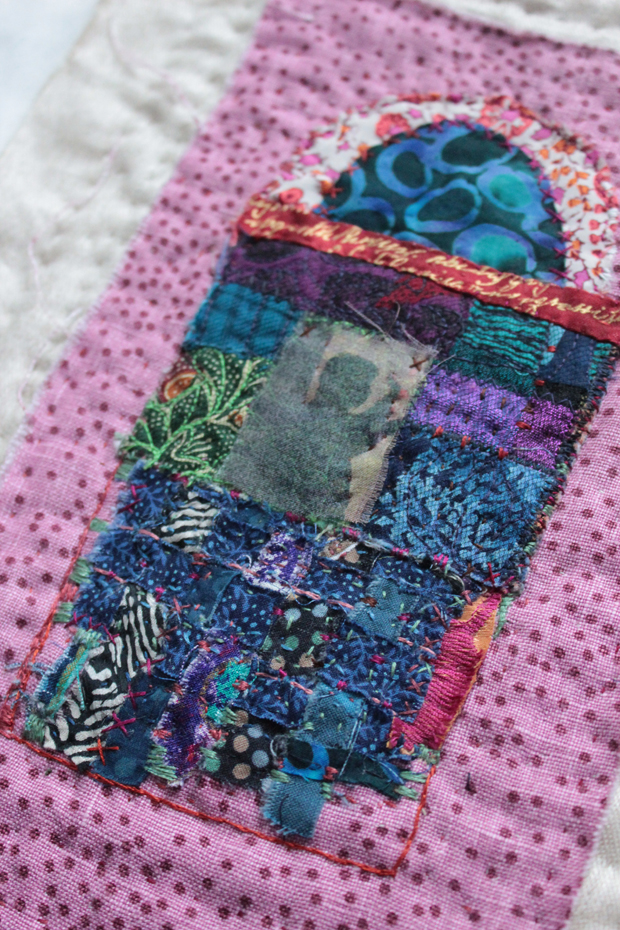
Here are two shots that give you a sense of the pliability of the thinner cotton product and how it takes a hand-stitch. The drape isn’t wonderful, but if making decorative wall-quilts, it probably doesn’t matter. More photos of the project at post’s end.


(The top of the building above was printed onto the cloth by the company spoonflower using a jpeg that I supplied. The lower part of the edifice was ink jet printed here at home).
2) INK JET PRINTING, homemade sheets
If you’re feeling a little more ambitious, you can prepare your own cloth for an inkjet printer using freezer paper.


- Rough cut rectangles of freezer paper and flatten before precision cutting.

- Make your final rectangle-cuts slightly shy of 8 1/2 x 11. This will help prevent printer jams. The last thing you want after this amount of effort is a printer jam!
- Cut your fabric to size and iron freezer paper on to the wrong side. Don’t be fooled by my process shot, below — I am purposely using the wrong side of the fabric for printing because I want the lighter color.


One reason you might want to make your own sheets is to feel better shelling out the money for the manufactured sheets!


For this print, I simply laid the collage down on the printer glass. The delicate pink vintage cotton is nearly sheer and will be fun to use down the road. If I had wanted to fiddle with the size, color saturation, or other features of the original, I could have photographed it and made adjustments on the computer prior to printing.


General ink jet printing tips:
- Don’t use “best” print setting because that lays down too much toner
- Sometimes reducing the size of an image creates a sharper final print
- Whether scanning originals from a printer glass or printing from a computer photo program, decide whether it’s more important to maximize the designs printed on each sheet or to leave seam allowances
- Remove backing sheet right away even if cloth is not for immediate use because otherwise the backing can stick.
- If backing does stick, simply apply more heat to remove.
- If color fastness matters, you might want to pre-treat fabric with a product called “Bubble Jet Set” and also rinse with synthrapol. Dharma Trading Co. sells these products. For wall quilts, I don’t bother. However, I do pre-wash.


3. OIL RUB transfers
Oil rubbing is simple and fun. The only trick is finding a xerox copier that lays down the right kind of toner. Luckily for me, the machines at my local library do.
Essential oils: eucalyptus and citrus.
Rubbing implements: bone folder is best but almost anything will work (plastic clay tools, wooden knitting needle, the wrong end of a pen).


The surface below your work area needs to have a little give but also be even. A cloth place mat topped by a plasticized study aid fits the bill.
Using a Qtip, distribute oil over entire backside of image. Tape down and rub. It’s that easy.


Direction of rubbing isn’t critical, but you must be thorough. I pull up the xerox and check a couple of times to see how it’s going. Some people won’t risk mis-aligning the image to do this and will, in fact, tape the bottom down, too. You’ll figure it out.


4. IRON ON TRANSFERS
Iron-on transfers leave a plastic surface that’s hard, shines, and won’t take a needle. They degrade in the wash, too, which is why they’re not even ideal for t-shirts. I’ve used them now and again though. When the kids were young, for instance, I helped every single first grader make their own Earth Day t-shirt.

Iron-ons of original art work (onto linen, say) make fine gifts when framed under glass. I’ve also used them for holiday sachets. These only come out a few weeks a year, so the durability issue isn’t key. You can make the sheen a feature by highlighting it with your other fabrics. Below, I used a metallic drapery print and two kinds of shiny, satin edgings.


Tips for iron-on:
- If orientation matters (for instance, when there is type), you must REVERSE your image before printing. Look for the ‘flip horizontally’ button.
- Avoid getting the sticky stuff on your iron by using a thin presser cloth.
- Something just shy of the iron’s linen/cotton setting works best. Too hot and you risk scorching. Too cool and the backing sticks on.
TA-DA! Now you now everything that I know about these four methods of photo transfer!


P.S. I have a large collection of black and white xeroxes from my teaching days — vegetables, sea images, religious iconography, dogs. If you’re desperate to try this method before finding the right kind of copier, let me know and I’ll pop a few in the mail to you. You can find essential oils in Whole Foods or other health food outlets (is Whole Foods even a health food outlet anymore?).